Let me explain: I had never heard of Django before, and it sounded like something big and complicated. Also, I’m busy, so I don’t have time to dive into something huge that isn’t related to my job. I still have scary related-to-my-job subjects that I need to catch up on! So I procrastinated. Pressed the snooze button. Is it already the end of April?!
(Well, I wrote this in April, but now it’s October. I told you I have a procrastination problem!)
If you’ve been following me for a while, you probably know that I volunteer at AliceCode and teach girls programming. This year, my group is doing Harvard’s CS50’s Web Programming with Python and JavaScript and their next project includes working with Django. That means I need to learn about Django, and that means that now you can learn it too!
Today we will learn what Django is, what its shtick is, and how to install it. No more time to waste — let’s get started!
What is Django?
Django is a Python-based free and open-source web framework that follows the model-template-views architectural pattern. — Wikipedia
Ok, too many fancy words, so let’s break it down:
Python
Python is a high-level programming language.
A high–level programming language is a programming language that is closer to human languages and further from machine languages.
(hey, don’t hate me, I am trying to cover all stages of knowledge here :D)
Web Framework
A web framework is a software framework that is designed to support the development of web applications. Web frameworks provide a standard way to build and deploy web applications on the World Wide Web.
Good examples of web frameworks you might’ve heard of are Angular and Vue.js.
Model-Template-Views Architectural Pattern
I don’t know about you, but I was not familiar with the MVT pattern. Apparently, MVT is a design pattern similar to MVC, which I did learn at university.
So first, we’ll refresh our memory of the Model-View-Controller (MVC) pattern, and then we will look at Django’s specificity for the Model-View-Template (MVT) pattern.
MVC Pattern
When talking about applications that provide UI (User Interface; web, or desktop), we usually talk about MVC architecture, which is based on three components: Model, View, and Controller.
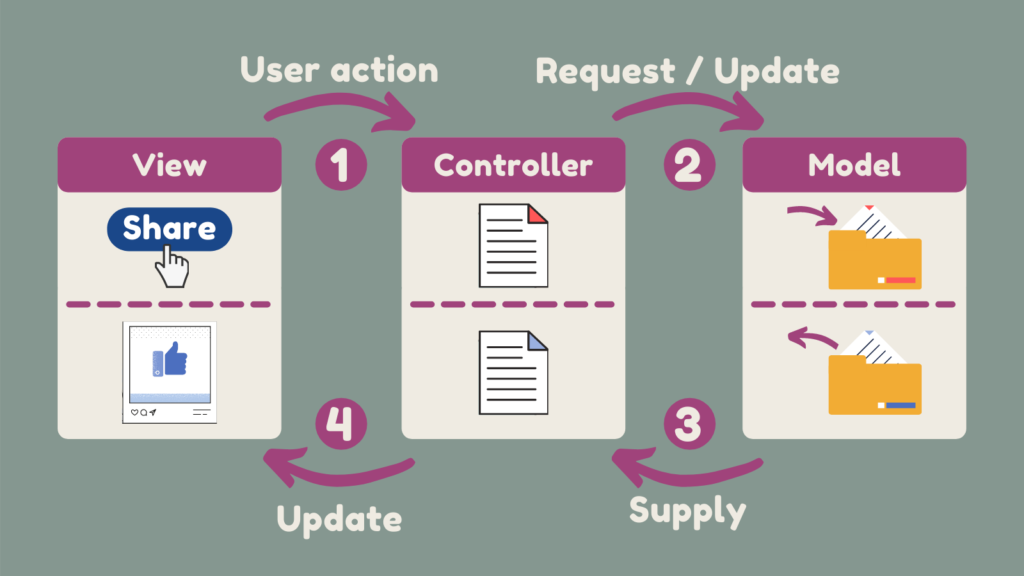
Let’s look at a super simple example: Let’s say our user is on Facebook and has just clicked the share button:
- The View updates the Controller with the action, i.e. the click button, and data, which is the post itself.
- The Controller transfers this information to the Model, which saves the post in the DB.
That’s one direction, but it doesn’t end here, does it?
3. The Model responds to the Controller with the new-post data.
4. The Controller sends the View an object that has all the data it needs in order to show the user a pop-up message saying “your post was published successfully”, and our user sees their new post on their page.
Django’s MVC — MVT Pattern
The main difference between MVC and MVT is that Django itself takes care of the Controller part, leaving us with the template. The template is an HTML file mixed with Django Template Language (DTL).
Django Template Language: Being a web framework, Django needs a convenient way to generate HTML dynamically. The Django template language is Django’s own template system.
The developer provides the Model and the View, and the Template then just maps it to a URL and Django does the magic to serve it to the user.
The following diagram illustrates how the components of the MVT pattern interact with each other to serve a user request −

[Source]
Well, I still don’t understand it fully, but I guess there are things that are better understood with experience. This is good enough for now!
Installing Django
For this installation, we are going to use the CLI, so for those of you who don’t know what it is:
0. Command-line Interface (CLI)
The command-line interface is a program on your computer that allows you to create and delete files, run programs, and navigate through folders and files.
On a Mac it’s called Terminal, and on Windows it’s Command Prompt. It is common to call it a terminal no matter which operating system you’re working with, and that is what I do as well.

As you will see soon, different operating systems have different commands for the same program or action.
According to the official installation guide, Here are the steps for installing Django:
1. Install Python:
If you already have Python installed, there is a nice table that shows you which Django version matches your Python version.

[Source]
You can check your Python version by opening the Terminal and typing python (and Enter). No response shows you don’t have it installed, otherwise, you will see the version number. For some, including myself, typing python won’t work, but typing py does.
Need to install python? Here is a nice tutorial.
Have Python installed but still can’t see it in the Terminal? Here is how you fix it.
2. Set Up a Database
According to this article, you don’t have to set up a database — even the official Django documentation says that “this step is only necessary if you’d like to work with a “large” database engine”.
I choose to set up a DB only when I see it’s necessary.
3. Install Django
There are several ways, this is the recommended one:
First, you need to install PIP. PIP is a package management system used to install and manage software packages written in Python.
According to the official documentation, PIP is already installed if you are using Python 2 >=2.7.9 or Python 3 >=3.4 and you can verify it by typing py -m pip --version in the Windows Command Prompt or python -m pip --versionin the Unix/Mac OS Terminal.
Now that we have PIP, all we need to do is type py -m pip install django in Windows or python -m pip install django in Unix/Mac OS. Hopefully, you will see it finish with
“Successfully installed Django-3.2 asgiref-3.3.4 pytz-2021.1 sqlparse-0.4.1”
4. Verifying
To verify that Django can be seen by Python, type python or py from your shell. Then at the Python prompt (where the lines start with >>>), try to import Django and print the version:
C:\Users\Admin> py
Python 3.9.0 (tags/v3.9.0:9cf6752, Oct 5 2020, 15:34:40) [MSC v.1927 64 bit (AMD64)] on win32
Type “help”, “copyright”, “credits” or “license” for more information.
>>> import django
>>> print(django.get_version())
3.2
>>>
Cool, we learned what Django is and have it installed!
The flow
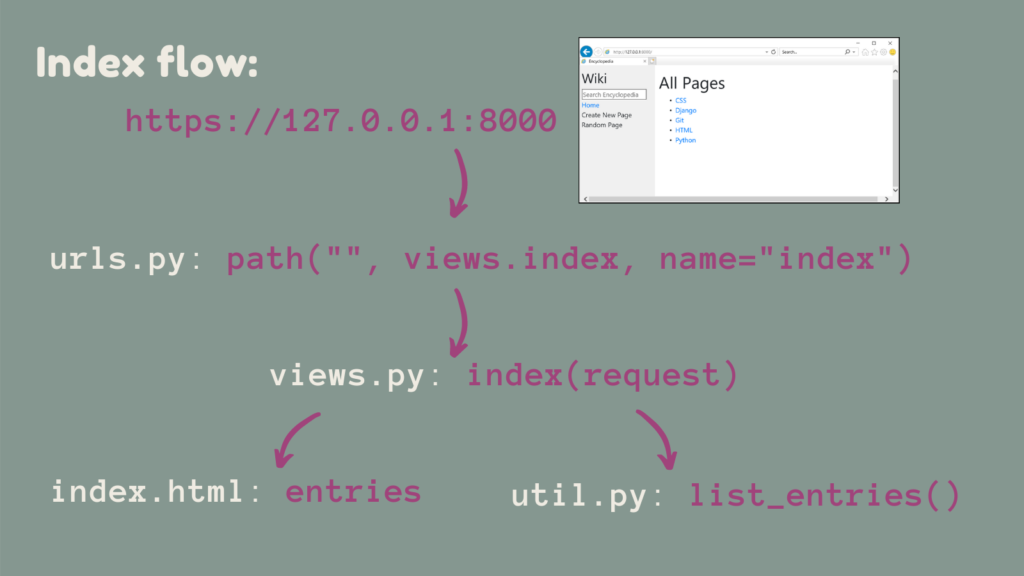
Now, to gain full comprehension, let me show you the flow of the index page from the CS50 Django project, because understanding this is critical, and that was my “ting!” moment (Full code can be found here).
1. encyclopedia/urls.py: path("", views.index, name="index") .
First of all, path= "" means it’s the home page.
Now, see views.index? It indicates that the next step in our trip is the views.py file.
def index(request):
    return render(request, "encyclopedia/index.html",
      {
        "entries": util.list_entries()
      }
    )
3. There are two things to notice here:
- The next step is index.html and that it’s going to have variable named entries:
{% for entry in entries %} - We use a function called list_entries() from the file utils.py:
encyclopedia/util.py:
def list_entries():
    """
    Returns a list of all names of encyclopedia entries.
    """
    _, filenames = default_storage.listdir("entries")
    return list(sorted(re.sub(r"\.md$", "", filename)
                for filename in filenames if
                filename.endswith(".md")))
Let’s see it in a chart:
Today we learned about Django and the Model-Template-View pattern. Then we covered everything needed for installation, including Python and PIP, and finished with an example showing how the flow looks like!
I hope things are clearer now. This is a great opportunity to get your hands dirty with the CS50 Django project that my AliceCode group is working on!
Additional Resources:
https://www.javatpoint.com/django-mvt
https://www.tutorialspoint.com/django/django_overview.htm
https://www.djangoproject.com/start/
https://cs50.harvard.edu/web/2020/projects/1/wiki/
