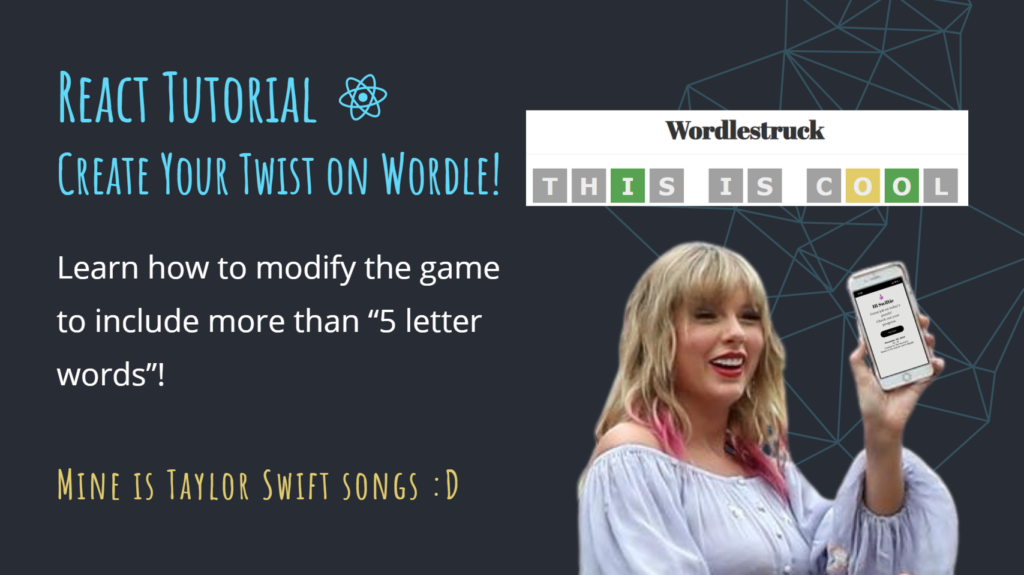
I’ve recently decided I would like to improve my React skills, and I knew the way to do it was to create a fun project. Therefore, I found a Wordle tutorial! It’s called Make a Wordle Clone with React by Net Ninja. That was a great start.
With this basic version of Wordle implementation (which from now on I will refer to as “the base code”), I chose to invest my best efforts in creating a game I would like to see in the world — “Guess the Taylor Swift Song Title”!
In addition, I developed the base code to include all the cool features the original Wordle game has to offer! You can read about it in my previous blog posts. To clarify, this blog post does not depend on them. Fun fact, the first thing I did after finishing the base code tutorial was adjust it to longer solution words.
So, grab the code base from Net Ninja’s GitHub (link), and join me in this tutorial! Instructions on how to clone the GitHub project can be found here. Which theme are you planning to give your Wordle? Let me know in the comments!
The agenda for this blog post is:
- Overview of the base code components
- Adjust the game to words longer than 5 letters
- Adjust the game to multi-word solutions
- Bonus – use an external data set
Are you ready for it? 😉

Overview of The Base Code
No need to show here how to do those steps because the YouTube tutorial does it very well. I’ll detail the state of the project post the tutorial, to connect you to the rest of the blog post.
The base code from Net Ninja’s GitHub can be found here. You can either clone his code and come join me now (instructions can be found here), or revisit this blog post after following his tutorial!
Let’s take a look at the files:
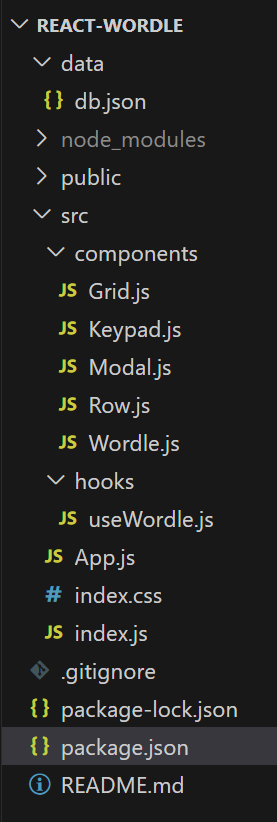
- db.json contains 2 JSON objects:
lettersandsolutions. The letters are used for the keypad functionality and the solutions are currently 5 letter words, with an ID attached:
{
  "letters": [
    {"key": "a"},
    {"key": "b"},
    ...
  ],
  "solutions": [
    {"id": 1, "word": "apple"},
    {"id": 2, "word": "hello"},
    ...
  ]
}
The base code pulls the solution words from the JSON file by running json-server in a separate terminal, which simulates a RESTful API.
- node_modules is where all your dependencies sit. If you don’t have this folder yet, you’ll have it after the next section (“Running the code”). We won’t be touching this directory.
- public folder contains static files such as
index.html, images, and other assets. This is where we’ll set our title, favicon, and themed images! - src folder is divided into two sub-folders:
- components directory has the different building blocks of the code:
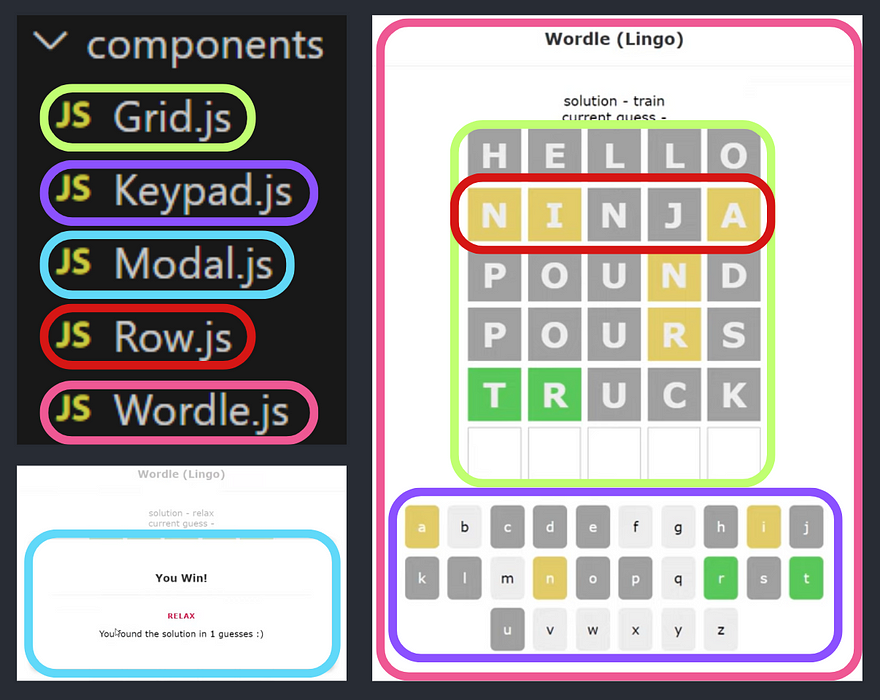
-
- hooks directory has our only custom hook:
useWordle.js.
- hooks directory has our only custom hook:
- App.js is the starting point of our game. This is where we fetch the solutions JSON.
- index.css is where we make our game pretty 😀
- package.json is used to run the project. This is also where you build it if you want to upload your game to the World Wide Web 😉
- README.md is where you explain your project, provide instructions on how to run it, and give a shout-out to Net Ninja thanking him for his base code 🙂
- There are more files in the project, but we won’t touch them.
Running the code:
- You’ll need to install all the dependencies by running these 2 commands (if you haven’t already):
npm i
npm i json-server
This is done only once in the project.
2. Run the json-server:
i. Open a new terminal
ii. Run the command json-server .\data\db.json --port 3001
3. Run the project: Open package.json, hover above “start” and click “Run Script”
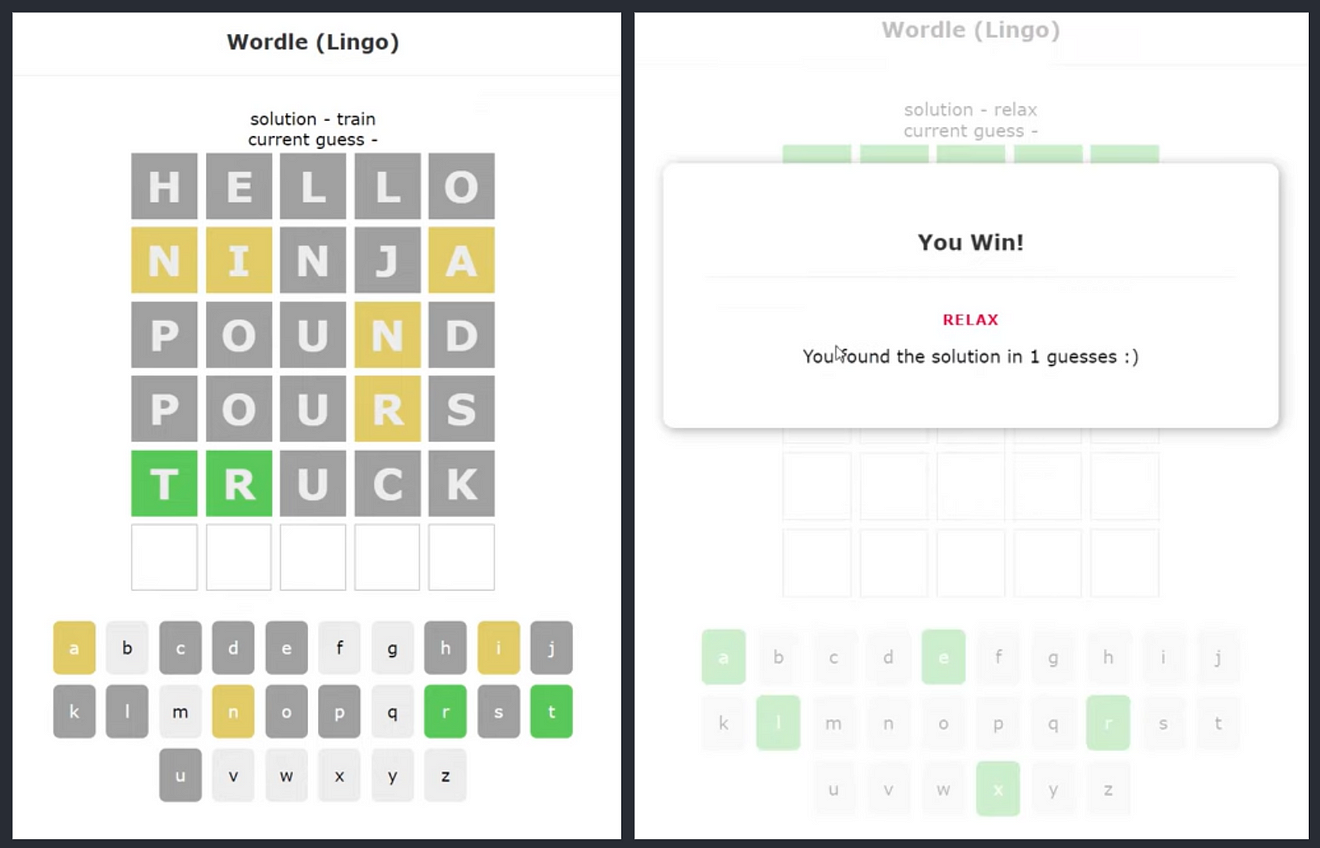
When you run the code you will see the page with the grid and the keypad. The keypad is not clickable and is here to show you all the letters and their colors. Above the grid there is the solution for this round, and the current guess the user is typing (for testing purposes).
Every time the user types a guess and presses enter, the tiles flip and color with green, yellow, or grey. The game ends when the user guesses the solution word or when the user does not manage to guess the solution word within 6 tries. Then, a modal pops up with a winning/losing message, the solution word, and the number of guesses it took.
Please note that every time you refresh the page, there will be a different solution word.
The overview is done… Let’s start coding! 😀

Adjust to Words Longer Than 5 Letters
The game as it is now is hardcoded for 5-letter words, in all parts of the application. Start by modifying your dataset to contain 6-letter words (so “apple” becomes “apples”, etc). Note that changing the data set will require re-running the json-server: ctrl+c if you have it currently running, and then json-server .\data\db.json --port 3001. Otherwise, you won’t see your changes.
The next step is to swap the hard-coded 5 with a length variable. This information, at the moment, is easy to gather with solution.length , but this won’t be the case when we add functionality for multi-word solutions later on 😉
We shouldn’t just use “replace all” in the editor because not all hard-coded appearances are with the character 5, as you will soon see. Instead, we should think logically — which components need to know the word size? The first one that comes to mind is the row — this component is the one dictating how many tiles are in a single row in the grid. It’s not the only place to change, but it’s a good start!
The Row Component
We’ll start by observing the existing logic. For us to do that, I attached here all the places that reference the five letters:
<div className=’row current’> (lines 6–13 above)
This div creates the row that the user is typing into. It means the map iterates over the characters that are currently in the guess and completes the rest of the row with empty tiles.
What does the code iterate on to finalize the empty tiles? The iteration is done on the array […Array(5-letters.length)] (line 10). This structure, […Array(5)], is equivalent to [0,1,2,3,4]. Considering we now have words longer than 5 letters, this value has to be modified:
For now, we will add length as a parameter of the Row component (line 1 below), and later on deal with passing this value. On line 5 we are now mapping the array [...Array(length-letters.length)].
<div className=’row’> (lines 17–23)
This code returns the empty rows that appear after the current played row. The five divs are the five tiles in each row. We can’t return 5 hard-coded divs anymore, we need the number of divs to depend on the length of the word! We do that by using a map:
In the new version, the divs have a key parameter (line 5 above). This is because it’s a requirement when creating HTML elements via a map (“Warning: Each child in a list should have a unique ‘key’ prop”).
Passing the length parameter
The next step is to pass Row the length parameter. As a reminder, the row is a part of the grid component, and the grid is a part of the Wordle component. The grid doesn’t know what the final solution is, it just receives guesses. The Wordle component has the solution, and therefore — access to solution.length.
Technically, we can use currentGuess.length and get the same information, with no dependency on the Wordle component passing the parameter. You can still do so. I preferred having one source of truth — solution.length, because I think it’s cleaner.
Note that there are two instances of Row in the grid component! (lines 4,6 above)
Cool, that was simple. The next place that has an explicit 5 reference is useWordle.js.
The useWordle Hook
Here we have a pretty easy swap as well because this hook also has access to the solution variable. Note that on line 6 above, the 5 is for the amount of turns, not the amount of characters! See? I told you replace-all wouldn’t work here 😉
For the rest of the occurrences, we carefully replace them with a new variable: let solution_length = solution.length. Notice that on line 14 below, you’ll need to swap the message string from ‘word must be 5 chars.’ to `word must be ${solution_length} chars.`. This includes both inserting a variable and changing from single quotes (‘) to backtick characters (`).
Last but not least – the styling!
The CSS file
If you skip this part, you’ll notice it pretty quickly, when only the first 5 tiles flip beautifully and the others just hitchhike with the first one.
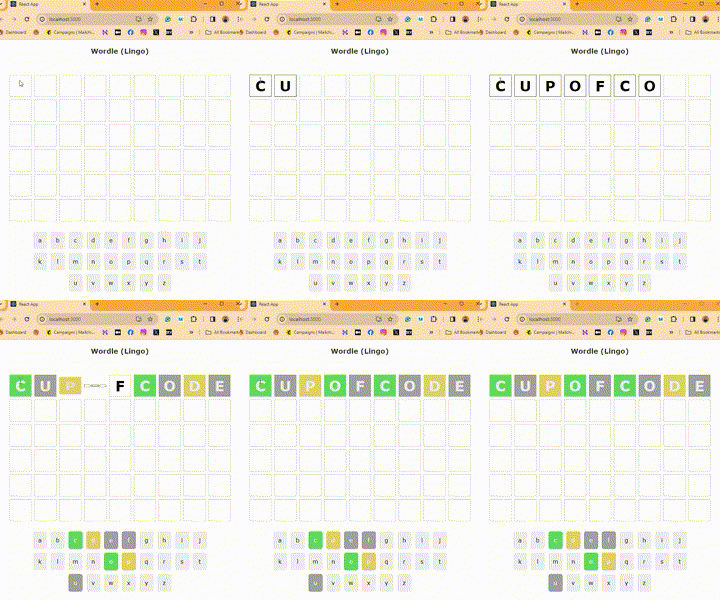
To fix this, we need to add animation to the siblings that come after 5:
You might consider changing the delay. If, for example, you have 15 characters — the flipping as it is now (0.2 seconds for each tile) will take 3 seconds, and that’s a long time to wait. You can modify the delay gap to be 0.1 seconds between tiles.
Moreover, it’s not straightforward to determine the amount of .row > div:nth-child(X){…} to put. Even when we unlock the wonderous world of longer solutions, there is a limit to how many characters you’ll give your user. Don’t forget we want this game to be mobile-friendly! For my game, I chose a limit of 13 characters (and the Swifties among you know why ;)).
By the way, the length limit on the word won’t be done here — it will be done in the data set. By that I mean your data set should contain only “correct” solutions, and you shouldn’t do checks for appropriate length in the game’s code. The only hint of the character limitation in the game would be here, in the number of tile animations in the CSS file.
That’s it! The rest of the code fits this feature “for free”. Tiny changes gained you the cool ability to have longer words. This is setting the ground for the juicy part of the game (both for coding the game and playing it) — the multi-word solutions!
A comic relief:
Adjust to Multi-Words Solutions
We currently can contain an “unlimited” amount of characters for our solutions, so what difference does it make if the solution is one word or more? Ooh! It makes a big difference, which lies in the split!
To make it easier to understand, let’s follow this tutorial with the example solution “Shake it off” in our minds. Shall we start?
Define The Split
There are several approaches to achieve the same goal. I chose the one that would be less disruptive to the existing game logic. By that, I mean that I chose to look at the solution term as one long word (with no spaces) and save next to it an array of the splits in the word, based on this new representation. It sounds complex, I know, so let’s look at an example:
“Shake it off” -> “shakeitoff”, [4,6]
Think of it this way: If I wanted to go back from “shakeitoff” to the real song title, after which indexes would I need to enter spaces? After indexes 4 and 6:
Shake it off
01234 56 789
Needless to say, song titles with a single word, will have an empty split array [].
Hold on! No need to manually start inserting split arrays into your data set!! At this point, you can choose one of two options: Prepare your data set to contain split, or calculate it “on the spot” when you gather the solution. I chose the first approach, and in my next blog post, I’ll share how I did it 😀
Introducing The Split Property
As I mentioned earlier, our dataset structure changes from this
"solutions": [
    {"id": 1, "word": "cupofcode"}
  ]
to this
"solutions": [
    {"id": 1, "word": "cupofcode", "split":"[2,4]"}
  ]
To introduce the split in the code, we’ll go to the same file where we get our solution value: App.js. We’ll process split the same way we did solution:
Now, keep in mind that removing whitespaces from a string is easier than inserting them, even if you have a split array. This is the reason why I chose to save the solution term with spaces, and then in the Wordle component have a variable solutionWithoutSpaces = solution.replace(/\sg/,””);. This is the value I use in the grid component and the useWordle hook.
The grid component needs the split parameter just so it can pass it to the row component. The row component is where the magic happens!
The Row Component
This component can return three different types of rows: One occupied with a past guess, one filled (fully or partly) with the current guess the user is typing, or one empty from letters.
We’ll start with the initial case: The empty row.
<div className=”row”> (lines 26-30 above)
With the solution “Shake it off” in mind, let’s think about what we want this Row to return. Our split array is [4,6]— This means we want space after the 4th and 6th tiles. This space will be achieved by another type of div class, which I named space-div with a small width and a zero-sized border (to override the border set for .row > div class).
.row > .space-div {
  width: min(2vw,20px);
  border: 0px solid #bbb;
}
We already have a map iterating over the character tiles, so all we have left to do is add the new div only if it fits the condition “Is the index in the split array?”
This is how it will look like:
{
  split.includes(i) &&
  <div
    key={`${i}_seperator`}
    className=”space-div”>
  </div>
}
Is that it? Almost! If you try to add this block below the existing <div key={i}></div> (on line 28), you will encounter an error: “JSX expressions must have one parent element”. This is easily solved by wrapping those two divs with <Fragment>. Now they have a parent!
Most times you don’t even need to use the full Fragment syntax, and can just use the shorter version: <>..code..</>. In our case, we do need to use the full Fragment syntax because we need to add a key (remember from earlier? The map function requires adding a key!), and you can’t do it with the short syntax.
With all that, our code looks like this:
Note that we have two divs and a fragment in the map, so we give each one a unique key: `${i}_frag`, {i} and `${i}_seperator`.
This was the first Row case — an Empty row. We took the initial map callback function, and wrapped it in a React fragment that contains a separator div when needed:
<React.Fragment key={`${i}_frag`}>
 <INITIAL_DIV_RETURNED>
 {
  split.includes(i) &&
  <div key={`${i}_seperator`} className=”space-div”>
  </div>
 }
</React.Fragment>
We will use the same fragment structure in the other row scenarios as well. The next case, in chronological order, is the current row (that the user is typing into).
<div className=”row current”> (lines 15-22 above)
In <div className=’row current’> , there are two arrays: One for the letters the user entered in the current guess, and one for filling in the empty tiles to match the length of the solution word.
In that second array, where it iterates length-letters.length times, make sure you use letters.length + i value to check if the index is split or not. Let’s see it in the code:
<div className=”row past”>
At this point, it’s easy peasy. We take the React fragment, insert the original div, and get:
Cool, all the rows are modified. Off to the next component!
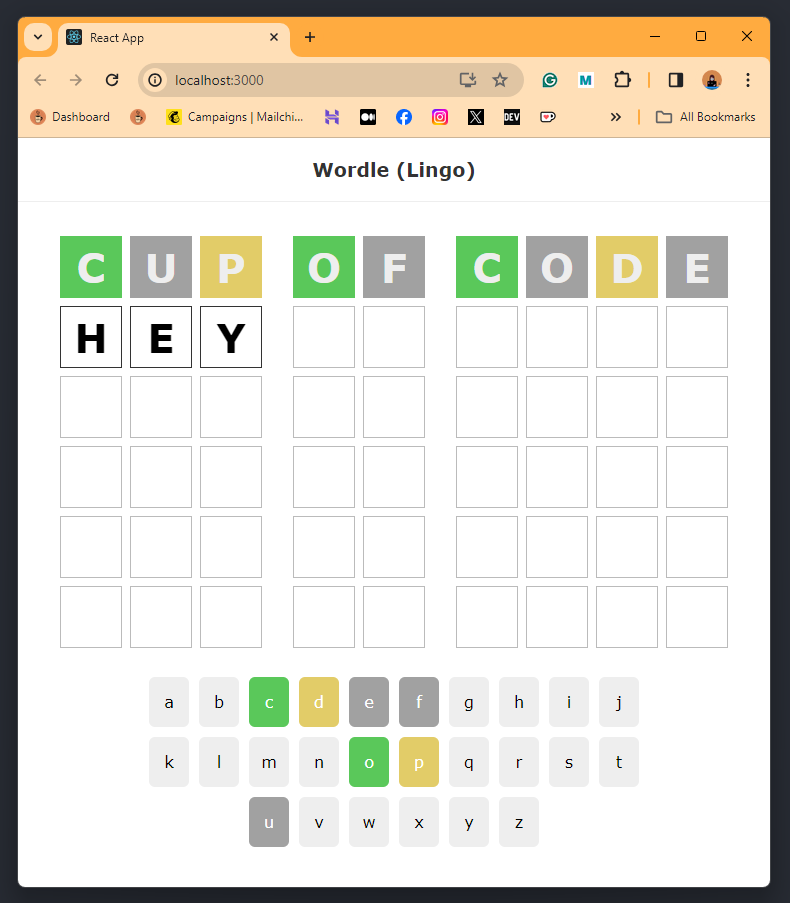
The useWordle Hook
You’d expect this file to contain some big changes. However, because we passed the solutionWithoutSpaces parameter, the hook doesn’t even know there were spaces in the original solution!
The CSS file
This only needs to be updated to accommodate the changes made in the Row component. In my case, it means adding animation delays up until the 13th child (the spaces from the split array are also .row > div). This is, of course, in addition to adding the style for the “space-div” class:
The Share String
This section is only relevant to those who followed the tutorial in my previous blog post. There, we created the squares string that the user gets when they click the “share” button after the game is done. This string represents the solution characters, which means we need to add spaces!
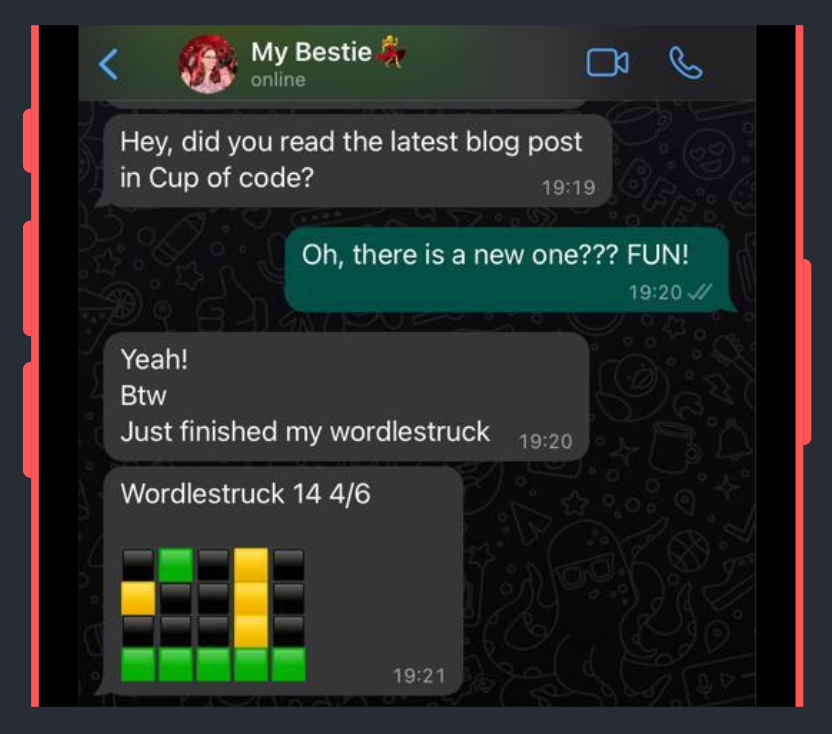
To do so, all we need to add is a tiny if condition. For each guess, we assign to every letter the appropriate square color. With the letters, we can also check the index!
That way, after adding the right colored square, we check: If the index is in the split array, it means there should be a space after this square, so we add it to the string:
Comic relief: Because life is too short to pretend you don’t like Taylor Swift songs 🙂
Bonus: External Data Set
I really wanted the data set to sit outside the project. Firstly, I wanted to place an extra step for the curious user who checks the browser’s developer tools to see the bank of words. Secondly, and most importantly, I didn’t want to rebuild and upload the whole project every time Taylor Swift released a new album (who else is excited about The Tortured Poets Department releasing in April??).
By having the data set in a different location, I decouple it from the main project, which is always a good practice — why create a dependency where there isn’t one?
Officially,
Decoupled architecture is an architectural approach that allows each computing component to exist and perform tasks independently of one another, while also allowing the components to remain completely unaware and autonomous until instructed. — source
In Wordlesturck’s case, it’s even better than just generic loose coupling because the data set is created in a different project (more about it in my next blog post :D), so I can update the file (and therefore the game) without touching the Wordle project!
Creating The External Data Set
Currently, our data set file is called db.json and it sits in the data/ directory. We’ll start by creating a new project, outside of the Wordle one, that will have that same db.json file.
besides the JSON file, you’ll need a netlify.toml file with the following content:
- The
netlify.tomlis a configuration file that specifies how Netlify builds and deploys your site. More about it here. - Lines 1–4 redirect https://react-wordle-db.netlify.app to https://react-wordle-db.netlify.app/db.json. Your code will work without it, I just find it nicer to see something and not an error when I click the link, as the developer.
- Lines 5–8 are needed to make it work 😀 Otherwise, when you load your game (the Wordle project), you’ll see a CORS error.

Now you can create a new site on Netlify using this project!
Calling The External Data Set
In our current code, we interact with db.json in two files: App.js for grabbing the solution, and and Keypad.js for pulling the letters.
As I mentioned in a previous blog post, I am strongly against saving the letters in the db file (more about it here). I prefer having them in the keypad component:
export default function Keypad() {
  const topRow = ["q","w","e","r","t","y","u","i","o","p"]
  const middleRow = ["a","s","d","f","g","h","j","k","l"]
  const bottomRow = ["z","x","c","v","b","n","m"]
...
So, I’ll be ignoring that part and focusing on the occurrence in App.js. But don’t worry, after this one, the keypad modification will be easy for you to do by yourselves.
Let’s start by observing the current code:
We’ll start by changing line 4 to fetch the file from our new location: https://react-wordle-db.netlify.app. Note that we are not pulling the solutions JSON specifically (AKA we don’t end with /solutions), but the whole file. Therefore, we need to adjust line 8 to address the solutions part of the JSON response:
const randomSolution = json.solutions[
  Math.floor(Math.random()*json.solutions.length)]
This will work. With that said, to keep our code quality high, I recommend adding some error-catching to this fetch call. We didn’t need it before because the file was local, but that’s not the case anymore.
So, to make the project as durable as possible, I chose to keep the original db.json file inside the project and gracefully fail into it if my db website had an oopsie.
Note that the original file will soon become “the old version”. This is ok because due to the game’s nature, the user probably won’t notice it: They receive only 1 solution per day, in random order.
This is how we’ll do it:
- Just like the
.then(...)function, we’ll add a.catch(...). This catch will contain the same code block that is in lines 5–12 above. - For this to work, we’ll need to declare
randomSolutionoutside the fetch, in line 4.
Before we test our error handling, there are two additional changes we should make.
We Don’t Need Fetch
Please note that you don’t need to use fetch(...) for local files. The base code had fetch because the developer was using the json-server package which acts like an external API server. As a result, The code was using the fetch function to grab the json.
json-server won’t work when you upload your website to Netlify, so I decided not to use it. Instead, we can simply do the following:
- We’ll start by importing the JSON using a simple import on line 1.
- Then, just like before, because we don’t have a specific API call with
/solutions, we turn anyjsonoccurrence tojson.solutions.
The next thing that would be nice to do is export the duplicate code to a function:
Notice that even though both calls to the setSolutionRelatedStates() function are with the json.solutions parameter, one is referencing the json variable from .then(json => { (line 17 above) and one references the json variable from import json from ‘./data/db.json’ (line 1).
Lastly, let’s see the error handling in action:
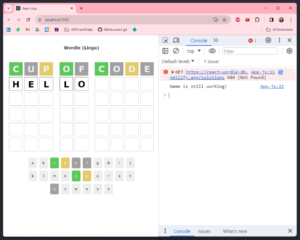
An easy error would be to add /solutions to https://react-wordle-db.netlify.app in the fetch.
And we’re done! In this blog post, we created a Wordle version that can have solutions longer than 5 characters, and multi-word solutions. We also set up an external location for the data set, so it will be decoupled from the main project.
To theme your wordle, all there is left to do is choose an appropriate name and logo, and gather the right data set. I will show you how I created mine in the next blog post 🙂
And for the Swifties out there, my game will launch VERY SOON! Connect with me on Linkedin to get notified when it’s online! 😀
