A few weeks ago I went to visit my parents and we sat down for dinner. While we were catching up, my dad mentioned that every evening he goes on his computer, and sends my mom an email with several Excel files she has been updating that day, for backup. I almost choked on my food! Every evening? Manual backup? In 2023?!
My first optimization idea was to swap Excel for Google Drive’s Sheet. This idea was declined because Excel’s user experience is so much better, that it is non-negotiable. Then my next suggestion was to set up a Google Drive syncing directory on the desktop. My dad rejected this idea as well because apparently, he had a resiliency threshold so high, that he did not want to put all his eggs in one basket: He wanted a multi-company backup, and he is achieving it by sending the files to two different email addresses, hosted by two different email providers.
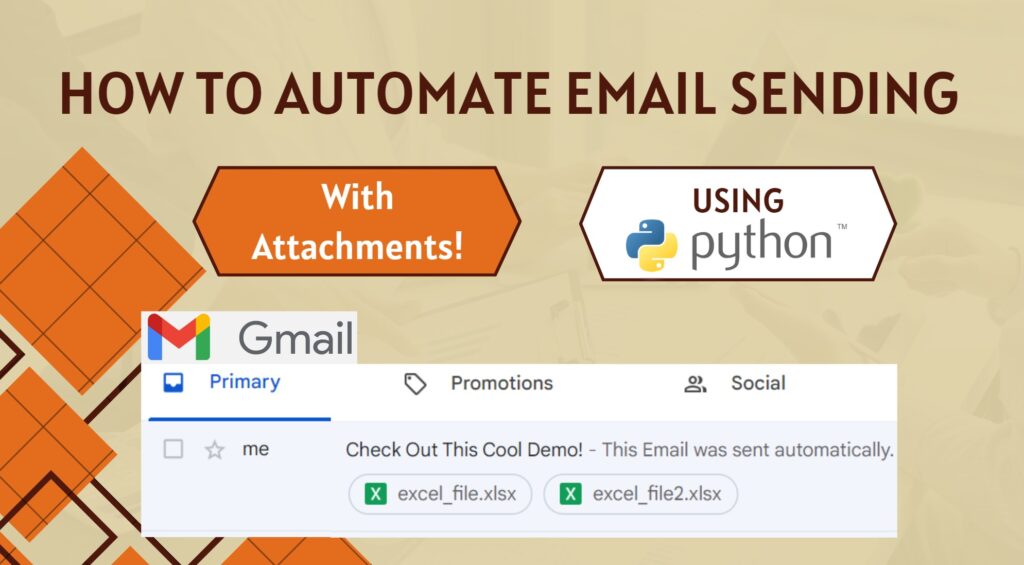
Now, let me be clear: I know that Google Drive is good enough for my mother’s precious spreadsheet files. This double-company backup approach is cracking a nut with a sledgehammer. With that said, this is what the customer wants, and I was excited to discover how to automate email sending, so we started laying down the requirements!

(Initial) Requirements
I was naive to think that we had everything covered at our first discussion. Later on, we realized that every little adjustment we decided to make along the way, resulted in additional, more specific, requirements, which I will cover later.
Now, we know the final goal is to have a daily email sent from my father’s email address to my mother’s email address but to be exact, we want:
- Daily automatic email from X@hotmail.com to Y@gmail.com.
- Easy manual send upon request as well.
- Attaching multiple Excel files, while the names of files may vary.
Therefore, I had a few things to figure out, with which I could create the whole program:
- Send an email through code.
- Attach files to that email.
- Extract the code to
.exefile. - Automate a daily send.
You might wonder why step 3 is necessary. There are two reasons for that: First, I want the program to be user-friendly for non-developers (like my parents). Second, I want to hide the code because, as you will see soon, it contains a Gmail app password. I am assuming .exe files can be disassembled back to code, but at least this is an extra layer of protection.
Luckily, I wasn’t the first one on the internet trying to code email sending, even with files attached! Nor I was the first to extract a .exe file from Python, and I was definitely not the first to want to automate an action on Windows. I will link useful videos at the end of the blog post. Now, let’s get started!
1. Send an Email through Code
I will admit that when thinking of automation and scripts, the first thing that came to mind was the shell — using the command line. But a quick YouTube search showed Python is a more friendly way, and that is what I went with.
Whatever coding language you are choosing, there is one thing you’ll need to use in order to send out emails: SMTP, or Simple Mail Transfer Protocol. This is how you send email messages between servers. If you will be using a Hotmail email address, you will need to authenticate through the Hotmail SMTP server.
This is the first point where our initial plan shifted. Setting up an SMTP connection to Gmail, which is what I used, requires you to set up a 2-step verification in your account. A 2-step verification is verifying who you are with more than just your password (usually sending code through email/SMS). Higher security for your account is never a bad thing, but the fact that this is a requirement shows that connecting to an SMTP server using your email address credentials is compromising your account.
I want an email sent, and I don’t mind from where (well, this will come back to bite us, stay tuned 😉 ) — so I can create a new account, one I don’t mind compromising its security, which only purpose will be my new cool software!
The way you set up your SMTP is by using app passwords. An app password is a 16-digit passcode that gives a less secure app or device permission to access your Account. Here are instructions for setting up an app password on Google.
Let’s start coding
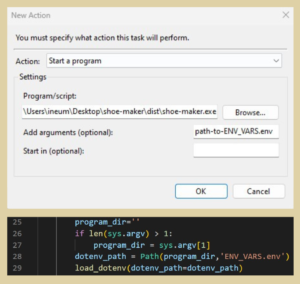
If I’m being honest, the first thing I did was refresh my memory about working with environment variables file. Those are variables whose value is set outside of the program. This is a critical step because the customers will use their own email recipients and their own file paths, and they shouldn’t need to open the code to set those.
ENV_VARS.env:
shoe-maker.py:
So what do we see in the code above? First of all, we see that I called my program shoe-maker.py, and you might wonder why. I will tell you at the end of this blog post.
- lines 6–7 are for directing the program to the location of the .env file. By the way, you can call it whatever you want, but
ENV_VARSis the standard. - lines 9–12 are saving the values we extracted from the file into local variables. Grabbing the values externally every time we want to use them is expensive.
- Lastly, lines 1–4 are all the imports the IDE complained you are missing. 😉
Wait a minute – PASSWORD in the env vars?
Let’s reflect on that screenshot for a minute. Despite being worried about compromising the email account, the app password is out and about in the env vars file. How come?
This is because I was mixing up who my audience is. I knew I was going to write this blog post, and I wanted to give you (people from the software field) the software with which you can set up your own email sender (and app password).
The problem is, that this is a different goal than providing a final product aimed at “real” users. Real users shouldn’t be exposed to any password, and it’s better to have as few env vars as possible so that the user will have fewer opportunities to make oopsies in the configuration.
So, from this point forward, I am setting the email address and password within the code.
3. Extract The Code to .exe File
Thanks to YouTube, I found this tutorial. Long story short, you need to install PyInstaller. Pretty easy to do, I’ll just mention that for me, when I used the regular pip install pyinstaller I got an error (CommandNotFoundException) and was able to bypass it with py -m pip install pyinstaller.
Could I’ve gone to figure out how to make pip the command work directly without the py -m? Yes. Was I going to do it while I was in the fun flow of my email-sending program? Nope. 😀
Speaking of errors, when I was trying to verify the installation went smoothly with the -v flag, I got an “I don’t know what are you talking about” error, and it took me too long to realize it was because it requires a camel case in the word PyInstaller:
Once you have it installed, you can create the .exe file by running py -m PyInstaller --onefile --icon=image.ico my_file.py. This way you create a my_file.exe file with the icon of your choice, using the code from my_file.py. Note that it has to be a .ico file. I used this website to convert my image from jpg. After a few seconds, you’ll see a new dist folder in your directory with your new .exe file.
Now that step 3 is behind us — we can continue with our code!

Back to Sending an Email Through Code
Sending a simple email
To focus on email sending, I temporarily set the variables in the program, instead of moving between files. You can see that in line 2 in the code below. Actually, at this stage, I didn’t even include files — I just wanted to see that I could send the most simple email.
Lines 4,17 are for catching exceptions, which I will touch on later.
I used the email-sending code from this video. You might noticed I renamed my sender email from EMAIL to GMAIL_ADDR. This is a good reminder that the code is set up to use the Gmail server (line 5). If my program was meant for people from the software world to use, setting up their own server (that might not be Gmail), I wouldn’t have hard-coded it. But for my use case, even if I have more users within my family, Gmail is good enough.
So, I started the connection (lines 6,7), logged in with the credentials (line 8), wrote a simple email (lines 10-13), and sent it (line 14). Lastly, on line 16, I notified the software user that the email was sent successfully (if we were on the happy path).
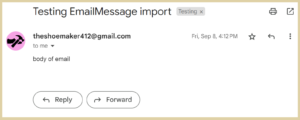
This is what it looks like on the recipient’s side:

Sending an email to multiple recipients
This is nothing complex, I am just showing the order in which I progressed. Sending the email to multiple recipients is easily done by a simple for loop, over the ‘recipients’ variable, which is an array of email addresses (strings).
Testing usage of env vars file
I know the pieces work well separately, but it doesn’t guarantee they will work well together too. So, at this stage, the program runs smoothly when I set the recipients in the env vars file, but later on, the env vars are going to cause one of my biggest bugs. Any guess at which point?
Error handling
I know that adding error handling is a bit excessive, considering I only plan to have between 1–2 customers (who are obligated to love me unconditionally). What can I say? I have a standard for coding, and I can’t half-bake it. Now that I think about it, graceful failure is important in this case because the user might update the env vars file incorrectly and will need some guidance in order to fix it.
So, what do we have here?
- In lines 3,5 I added colors because I wanted to differentiate between the error message and the instructions for the user.
- In the instructions (lines 6–8), I informed the user that this process failed and that they would need to send an email themselves. Also, I invited them to contact support, and lastly — to close the program.
- I split the instructions into 3 lines because it’s easier to read for the developer (rather than to scroll right).
The reason I added the input() in the end is so that the user will have as much time as they need to read the messages.
I’ve added more error handling later on, but let’s continue the story in chronological order.
Refactoring
This refactoring is coming from the tutorial I linked earlier. We have two changes to make:
First, If you swap the line:
with smtplib.SMTP(‘smtp.gmail.com’, 587) as smtp:
with smtplib.SMTP_SSL(‘smtp.gmail.com’, 465) as smtp:
then you can remove the following two lines because they now happen behind the scenes.
What exactly is happening behind the scenes? SMTP_SSL connects to the server using a secure encrypted SSL protocol (SSL stands for Secure Sockets Layer,), while SMTP doesn’t, which is why we need to add the starttls() function right after connecting. ehlo() function is for the server to say hello and identify 🙂
Note that the different connections use different ports (587 vs. 465).
The second refactoring is happening in the message content: Swapping
msg=f’Subject: {subject}\n\n{body}’
with a more comfortable structure. This is done by using EmailMessage import.
Using the new import, we set the message object like this:
msg = EmailMessage()
msg['Subject']=subject
msg.set_content(body)
The most important thing in refactoring is checking we didn’t botch anything that used to work fine 😀
Still working! Now we can progress to step 2.
2. Attaching Files to The Email
Let me remind you, that the whole purpose of this project was to send Excel files. Luckily, adding an attachment to the email is done by a simple update to the code: Given the file path, you gather the variables needed for the msg.add_attachment(…) function:
And for multiple files — just wrap this code in a loop.
That’s cool if we have the paths in the correct form. Unfortunately, it turns out that gathering the paths from the env vars file wasn’t as easy as I thought it would be:
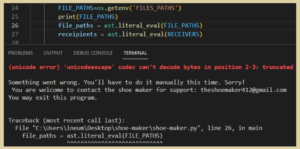
Encountering My First Major Bug
What is this error saying? The error is rising from the beautiful ast.literal_eval(..) function. This function parses strings representing types, into the actual type (here we use it for arrays). In this case, the function can’t parse my file paths string from the env vars file because of Unicode escape errors: My file path location (C:\Users\…) triggers the function to convert the string to the format of a 4-digit hexadecimal code point (for example, “ABC” becomes “\u0041\u0042\u0043”), which makes the path absurd.
One solution for this problem is adding the r prefix to all the paths (r"myfriend@gmail.com"). This r stands for “raw”, and with it, the string will be read exactly as it is written. I didn’t want to go that route because I don’t think it’s a good practice to “force” the user to adjust to my program’s limitations. The users should add file paths as they see it in the file explorer and the conversion to the right format should be done inside the code.
With that in mind, this is the solution I wrote:
First, I save the env var as a string (including brackets, commas, ditto marks (“), and white spaces). Then, I removed the brackets and split the string by the commas. Now I have an array of strings, but they still begin and end with ditto marks. This brings me to my final line of code: Strip each of the strings of any ditto marks and white spaces. In case you wondered, I’m handling white spaces because some people like to write lists with white spaces after the commas.
Note that the paths’ backslashes have converted from \ to \\ automatically, in order to avoid those escape characters I mentioned before.
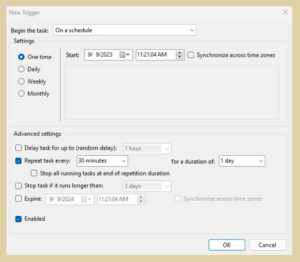
So far we have sent an email, added attachments, and exported the program to .exe… At this point, we can put the .exe file on the desktop and send emails at the click of a button! All we have left to do is to automate that task.

Useful links:
- How to Setup Gmail SMTP Server
- How To Set Up SMTP Server In Gmail
- How to Send Emails Using Python — Plain Text, Adding Attachments, HTML Emails, and More
- Using .env Files for Environment Variables in Python Applications
- Difference between console, terminal, command line (CLI)
- Standalone Python EXE Executable — Python Tkinter GUI Tutorial